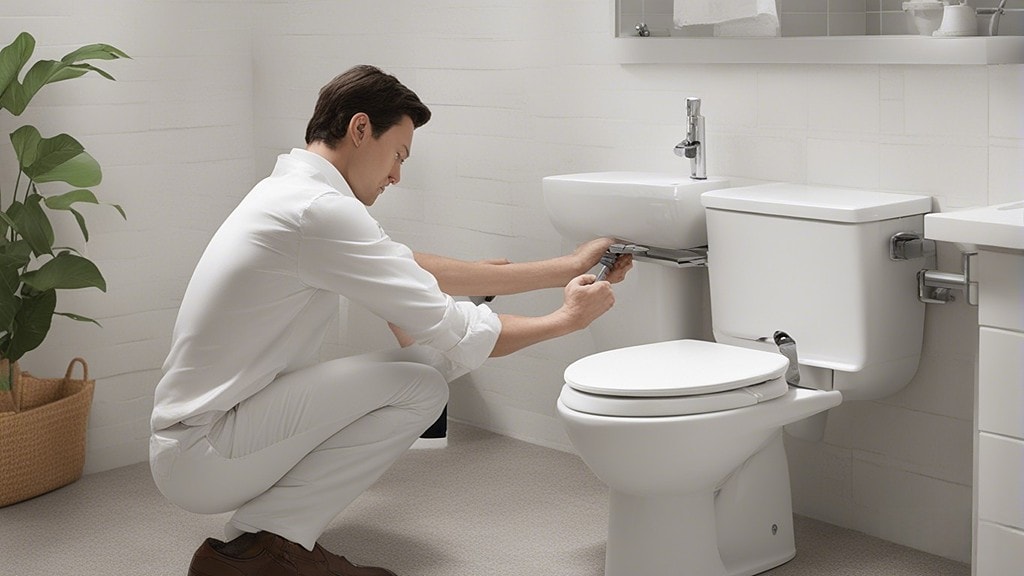
Bio Bidet Ultimate 770: Step-by-Step Installation Guide”
Caught in a pickle with your Bio Bidet Ultimate 770 installation?
Your bathroom is all set for the upgrade, but the installation is proving to be a stubborn mule.
We get it.
It’s like trying to solve a Rubik’s cube with one hand tied behind your back.
But hey, worry not.
This guide has got your back.
We’ll walk you through the installation, step-by-step.
No jargon, no complications, just plain English.
You’ll have your bidet up and running before you can say ‘Ultimate 770’.
So, let’s get started, shall we?
Table of Contents
Safety Precautions
When it comes to installing the Bio Bidet Ultimate 770, safety should always be your top priority.
Here’s a checklist to ensure you’re taking all the necessary precautions:
Electrical Safety
Before you begin the installation process, make sure the area is free from any water spills.
Electrical devices and water don’t mix well, and the last thing you want is an electrical mishap.
Always ensure that your hands are dry when handling the bidet’s electrical components.
GFCI Outlet Importance
It’s crucial to have a Ground Fault Circuit Interrupter (GFCI) outlet in your bathroom.
This type of outlet is designed to protect you from electrical shocks by cutting off the power if there’s any imbalance in the current.
If you don’t have one, consider getting it installed before setting up your bidet.
Installation Area
Ensure the area where you’re installing the bidet is clean and free from any obstructions.
A clutter-free space will not only make the installation process smoother but also reduce the risk of accidents.
Electrocution Risks
Always remember to turn off the water supply and unplug any electrical devices in the vicinity.
Water is a good conductor of electricity, and any negligence can lead to electrocution.
It’s always better to be safe than sorry.
Installation guide for Bio Bidet Ultimate 770
Gather the Needed Tools
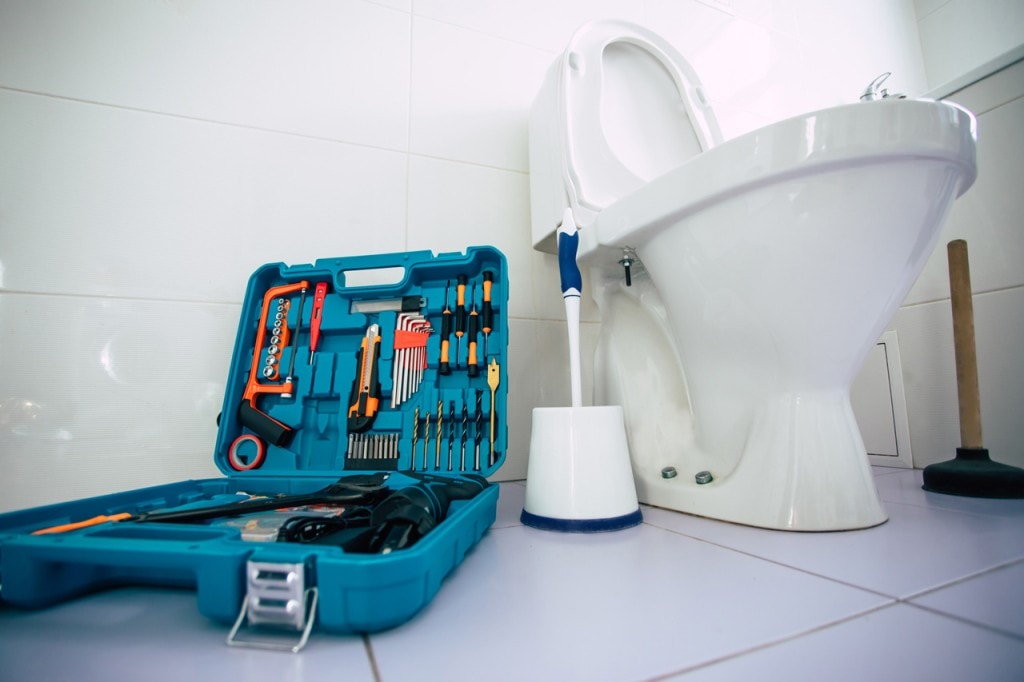
Before diving into the installation process of the Bio Bidet Ultimate 770, it’s crucial to ensure you have all the necessary tools on hand.
This will not only make the process smoother but also prevent any unnecessary interruptions.
Tools You’ll Need:
- Head Screwdriver: Essential for handling the mounting plate that secures the bidet to the toilet.
- Flathead Screwdriver: Useful for popping off the covers of the toilet seat mounting hardware.
Depending on your current toilet seat mounting bolts, you might need either a flathead or Phillips.
- Towel or Small Container: There might be some water spillage during the process, so it’s a good idea to have something to catch the water.
- Rag or Rubber Jar Gripper: This will assist in hand-tightening various components, ensuring a secure fit without over-tightening.
- Extension Cord: The power cord of the bidet is approximately 4 feet (around 3.9′ or 1.2m). If your outlet isn’t within this range, you’ll need a three-pronged extension cord.
While there are specific bidet extension cords available, any three-pronged cord should suffice.
Preparing Your Workspace:
Before you start, set all your tools aside in an easily accessible location.
This will save you time searching for them in the middle of the installation.
Also, ensure your workspace is clean and free of any obstacles.
Shut Off the Water and Flush the Toilet
Before we get into the nitty-gritty of installing the Bio Bidet Ultimate 770, it’s essential to ensure that the water supply to the toilet is turned off.
This step is crucial to prevent any water mishaps during the installation process.
Let’s break it down.
Turning Off the Water Supply
Locate the small valve that’s typically found protruding from the wall or floor on the lower left-hand side of the toilet.
This valve controls the water supply to your toilet.
To shut it off, simply turn the valve clockwise.
It’s as easy as that!
Flushing the Toilet
After shutting off the water supply, it’s time to flush out any remaining water in the toilet tank.
Press down on the toilet lever and hold it there until you hear the sound of water draining come to a stop.
This action will mostly empty the toilet tank.
However, be prepared for a bit of dripping when you move on to the next steps.
Remove the Water Supply Hose from the Toilet Tank
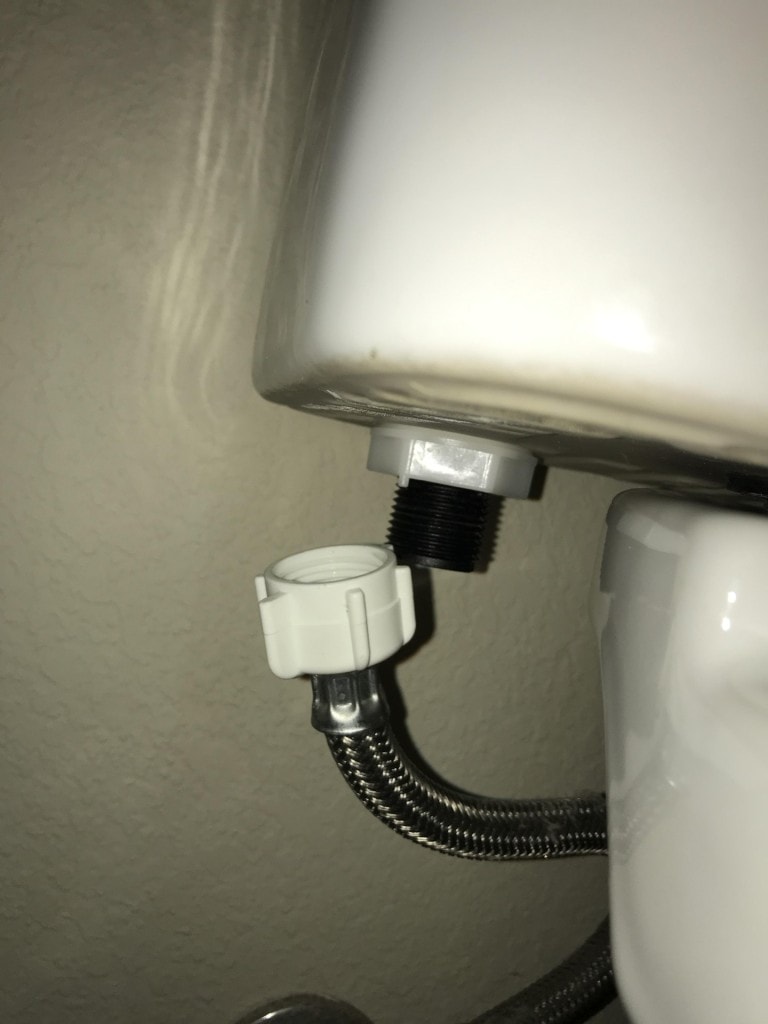
Before proceeding with the installation of the Bio Bidet Ultimate 770, it’s essential to disconnect the water supply hose from the toilet tank.
This step ensures a smooth transition as you set up your bidet.
Let’s dive into the details.
Locating the Hose
Identify the hose that connects to your toilet tank.
For traditional 2-piece toilets, this hose usually extends from the tank’s bottom.
Sometimes, it might be connected to the toilet’s back.
If you have a skirted toilet, which hides the water connections, you might not immediately see where the hose connects.
In such cases, you might need an extension hose or a different T-valve designed for skirted toilets.
Disconnecting the Hose
Place a towel or container beneath the hose to catch any residual water.
Using a rag or rubber jar gripper, grip the hose and twist it clockwise.
Remember, when observing your hands, this motion will appear clockwise.
However, if you’re looking from underneath, it would seem counter-clockwise.
You can start by loosening the hose and then use the towel or container to catch any dripping water as you complete the removal.
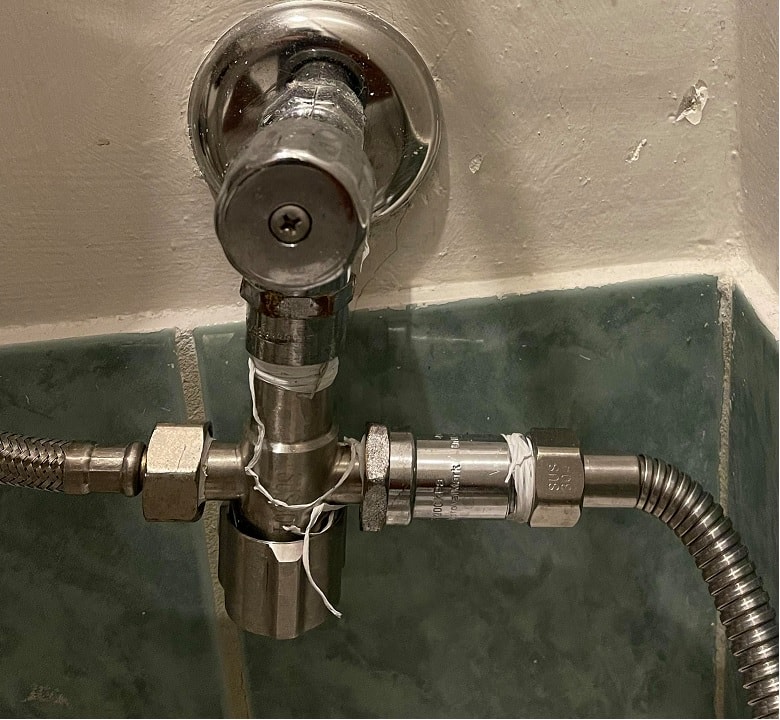
Install T-Valve and Attach the Hoses
Before we move on to the main event of installing the Bio Bidet Ultimate 770, it’s essential to set up the T-valve and attach the hoses.
This step ensures that the water supply is appropriately split between the toilet tank and the bidet.
Let’s get to it!
Setting Up the T-Valve
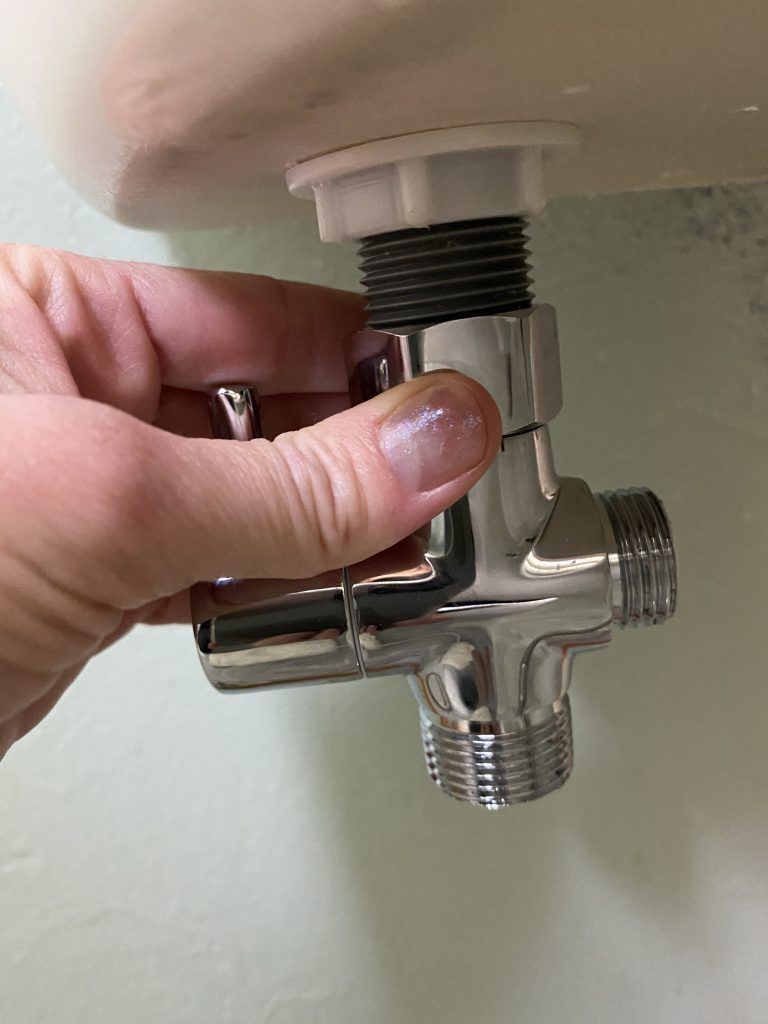
- First off, check the o-ring.
It should be correctly oriented.
If it’s not already in place, ensure it’s situated right side up and snugly fit inside the T-valve.
- Now, thread the T-valve onto the toilet fill valve.
This is the threaded part you’ll find on your toilet.
Use a rag or gripper to tighten it to about 80%.
- Before you go all out and tighten the T-valve completely, make sure the horizontal port is pointing towards where the bidet seat will be.
This orientation is crucial for the next steps.
Attaching the Hoses

- With the T-valve in place, it’s time to attach the hoses.
Start with the bidet hose.
Attach it to the horizontal port of the T-valve.
- Next, take the water supply hose (the one you removed earlier from the toilet tank) and connect it to the bottom of the T-valve.
Remove the Existing Toilet Seat
When it comes to installing the Bio Bidet Ultimate 770, removing the existing toilet seat is a pivotal step.
Let’s walk through the process.
Locating the Seat Fasteners
Most toilet seats are held firm by white plastic screws and fasteners.
These fasteners are typically located underneath the seat.
To access them, you might need a flathead screwdriver to gently pry open the protective flaps covering the screws.
Unfastening the Seat
Once you’ve located the screws, it’s time to remove them.
Hold onto the fasteners from the underside and turn your screwdriver counter-clockwise to loosen the bolts.
After you’ve loosened them a bit, you might find it easier to keep the screwdriver steady and unscrew the fasteners by hand.
Handling Different Seat Types
Not all toilet seats are the same.
Some toilets have bolts and seats that are permanently fixed.
In such cases, you’d only need to unscrew the fasteners by hand.
If you’re dealing with toilets that have skirted trapways, they often use top-mounting bolts.
For these, there aren’t any fasteners on the underside to hold onto.
Just use your screwdriver to remove the bolts.
Setting Aside the Old Seat
After you’ve successfully removed the bolts and fasteners, lift the old toilet seat off and set it aside.
You won’t be needing it for the rest of the installation process.
Insert the Rubber Nuts Into Bolt Holes at Back of Toilet Rim
When it comes to the Bio Bidet Ultimate 770 installation, ensuring the bidet seat is securely attached is paramount.
One of the steps that might seem minor but is crucial for a sturdy fit is inserting the rubber nuts into the bolt holes at the back of the toilet rim.
Let’s get into the specifics.
Prepping the Rubber Nuts
Before you start, it’s essential to make the rubber nuts more pliable.
How?
Simply turn on your tap to warm and run one of the black rubber mounting nuts under the warm water for a bit.
You’ll notice it becomes significantly more flexible, making the insertion process smoother.
Inserting the Rubber Nuts
Once you’ve warmed up the rubber nut, it’s time to get it into place.
Insert the now-flexible rubber nut into one of the bolt holes at the back of the toilet rim.
The warmth makes it easier to fit snugly.
Repeat the process with the other rubber mounting nut on the opposite side.
Why This Step Matters
You might wonder, “”Why all the fuss about rubber nuts?”” Well, these little components ensure that the bidet seat remains firmly in place, preventing any wobbles or shifts when in use.
It’s all about ensuring comfort and stability for the user.
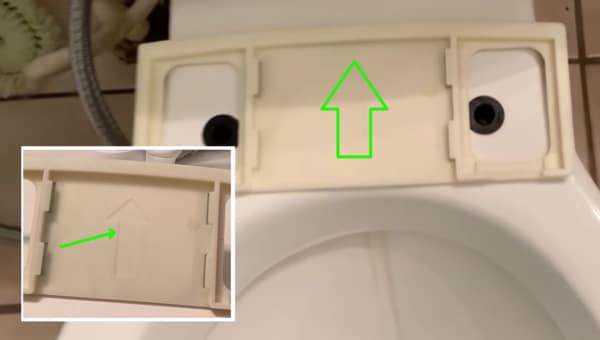
Attach and Align the Mounting Bracket at the Back of the Toilet Rim
When installing the Bio Bidet Ultimate 770, one of the crucial steps that often gets overlooked is attaching and aligning the mounting bracket at the back of the toilet rim.
This step ensures that the bidet seat remains securely in place, providing a comfortable and stable experience for the user.
Locating the Mounting Bracket
First, you’ll need to find the plastic mounting bracket.
This bracket should be placed over the back of the toilet rim.
Ensure the arrow on the bracket is facing upwards and pointing towards the toilet tank.
Why?
Because with the arrow facing up, the grippers will be on the underside, preventing the plate from sliding over time.
Setting Up the Bracket Holders
Next, insert a bolt through a washer and then through a bracket holder.
Ensure the curved end of the bracket holder is facing upwards.
This setup will help in securing the bidet seat firmly.
Tightening the Bolts
Using a Phillips screwdriver, thread the bolts into the rubber top-mounting fasteners.
If you’re using top-mounting hardware, there’s no need to hold the fasteners on the underside while turning the screws.
Tighten them most of the way, but leave a little room for adjustments.
Ensuring Level Alignment
Before you fully tighten the bolts, count the number of grooves above or below the bracket holder.
Ensure the number is consistent on both sides.
This step ensures that the mounting plate remains level when fully tightened.
Final Adjustments
Once you’ve attached the bidet, you might notice that it’s positioned too far back or forward.
If that’s the case, simply loosen the bolts and adjust the bracket holders accordingly.
This adjustment ensures that the bidet seat aligns perfectly with the toilet rim.
Mount the Bidet Seat
After setting up the mounting bracket and ensuring it’s aligned correctly, the next crucial step in the installation process of the Bio Bidet Ultimate 770 is mounting the bidet seat itself.
This step ensures that the bidet seat is securely attached to the toilet, providing a comfortable and stable experience for the user.
Positioning the Bidet Seat
Start by positioning the bidet seat snugly up against the mounting plate.
Push it towards the plate, giving the seat a slight jiggle until you feel it catch.
This “”catch”” is the bracket sliding into the grooves under the bidet seat.
Once you’ve got that connection, push the bidet the rest of the way until you hear a reassuring click.
This click indicates that the bidet seat is securely in place.
Connecting the Bidet Hose
Now, it’s time to connect the bidet hose.
Locate the bidet side of the braided metal hose and the L-shaped water inlet on the right-hand side of the bidet.
Attach the hose to the bidet, ensuring a snug fit.
Tighten it securely, but be careful not to over-tighten, as this might damage the connectors.
Checking for Leaks
After mounting the bidet seat and connecting the hose, it’s essential to check for any potential leaks.
Turn the water valve counterclockwise to open it.
Once the valve is open, inspect the paths of the two hoses for any signs of water leakage.
Pay close attention to the T-valve and bidet connections.
If you notice any leaks, the connections might need further tightening or re-adjustment.
Open the Water Valve
After successfully mounting the Bio Bidet Ultimate 770 and ensuring all connections are secure, the next crucial step is to open the water valve.
This action will allow water to flow into the bidet, enabling its functionalities.
Let’s delve into the specifics.
Why Opening the Water Valve is Essential
The Bio Bidet Ultimate 770 relies on a steady water supply to function optimally.
By opening the water valve, you’re ensuring that the bidet seat can access the water it needs to provide a refreshing and hygienic experience.
Without this step, the bidet would remain non-functional.
Steps to Open the Water Valve
- Locate the Water Valve: Typically, the water valve is situated on the lower left-hand side of the toilet, protruding from the wall or floor. This is the same valve you turned off at the beginning of the installation process.
- Turn the Valve Counterclockwise: To open the valve and allow water to flow, turn it counterclockwise. You should hear the sound of water rushing as it fills the bidet’s tank.
- Monitor for Any Leaks: As the water starts flowing, it’s essential to keep an eye out for any potential leaks, especially around the T-valve and hose connections.
If you spot any drips or water pooling, it might indicate that a connection isn’t tight enough.
In such cases, shut off the valve, address the issue, and then reopen it.
Plug It in and Test It Out
After meticulously following the installation steps for the Bio Bidet Ultimate 770, it’s time to power it up and test its functionalities.
This phase is essential to ensure that the bidet operates optimally and provides the desired comfort and hygiene.
Let’s guide you through this electrifying process.
Connecting to Power
- Locate the Power Cord: On the right-hand side of the Bio Bidet Ultimate 770, you’ll find the power cord. Ensure it’s free from any twists or knots.
- Plug into a GFCI Outlet: Given the bidet’s electrical nature, always use a GFCI outlet for safety. If the outlet isn’t within the 4 feet range of the bidet’s cord, use a three-pronged extension cord.
Powering On the Bidet
- Switch On: Once plugged in, turn on the bidet using its power button. You should notice the LED indicators light up, signaling that the bidet is operational.
- Check the Remote Control: The Bio Bidet Ultimate 770 comes with a remote control for ease of use. Ensure it’s paired and responsive. If not, refer to the owner’s manual for pairing instructions.
Testing the Features
- Seat Sensor: The bidet is equipped with a seat sensor to ensure it operates only when someone is seated. Gently press down on the seat to mimic the weight of a user and test its functionalities.
- Water Spray: Activate the water spray feature. Check for consistent water pressure and ensure the nozzle operates smoothly.
- Temperature Settings: Test the seat and water temperature settings. Adjust them to your preference and ensure they respond accordingly.
- Night Light & Other Features: The Bio Bidet Ultimate 770 boasts a night light feature for added convenience. Test it out along with other features like the sitz bath and nozzle cleaning.
Conclusion: Bidet Installation Mastered!
Well, there you have it, folks!
From befuddled to bidet guru, you’ve come a long way, my friend.
You’ve tackled electrical safety like an electrician, nailed the nuts and bolts like a seasoned carpenter, and performed plumbing sorcery like a wizard.
Your Bio Bidet Ultimate 770 is now installed, and it’s all systems go for some good, clean fun! 🚀
Before you do the victory lap around your bathroom, just remember: maintenance is the key to keep this seat of luxury doing its thing for the long haul.
So keep it clean, keep it safe, and for heaven’s sake, don’t forget to enjoy all those plush features.
Your posterior will be posting five-star reviews!
So go on, make the inaugural flush and step into a world where bathroom experiences are never just ‘meh’ again.
In the realm of bidets, you’re now royalty, and the Ultimate 770 is your throne.
If you hit a snag or have questions, don’t sweat it; Bio Bidet’s customer service is a call away.
Until then, may your wash be warm, your seat be heated, and your day be as flawless as your installation skills.
Happy Spritzing! 💦👑
FAQs
How do you install a bio bidet?
The installation of a bio bidet involves shutting off the water supply, removing the existing toilet seat, attaching the T-valve, connecting hoses, mounting the bidet seat, and then connecting it to power. Always refer to the specific model’s owner’s manual for detailed instructions.
Can I install a bidet myself?
Yes, most bidets are designed for DIY installation. However, if you’re unsure or uncomfortable with the process, consider consulting a professional.
How do you turn off the light on a bio bidet Ultimate 770?
To turn off the light on a Bio Bidet Ultimate 770, navigate to the bidet’s settings or control panel and locate the night light or LED light option. Toggle or press the designated button to turn the light off. For specific steps, refer to the owner’s manual.